Scrap Bag Sampler Week 3 – Two Tone Wonky Star


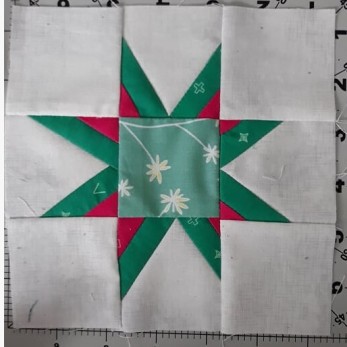
Two Tone Wonky Star Tutorial – 6 “ finished

Today you are in for a treat as it is my  turn on the schedule! We are going to make a variant of the wonky star. Do you have lots of little pieces of offcuts hiding in your stash bucket? These will be perfect for the star points.

If you don’t fancy doing a little star or two tone- see here for variants on the pattern including upsizing to 12” finished, using one fabric or even offsetting your stars! (These will be released over the weekend)

111

Materials:

222

  • 1 x 2.5” square (centre)
  • 8 x 2.5” square (background and star points)
  • 16 x 1” x 3” scraps for the star points

Tip: Due to the smaller pieces involved throughout the stages when pressing between each step I would recommend finger pressing or using a seam roller to avoid distortion of the seams/fabrics. Once the block is assembled press using an iron to set the seams and ensure a smoother look.

Tip: Some of you may prefer longer or fatter stars in which case adjust the size of your strips by ¼” to ½” either in length or width.

 Method

1 – Take a background 2.5” square and the rectangle piece to be the outer point of the star. Lay it right side down on top of the square on the top right side. Changing the angle of the way it is laid down will affect the wonk of the star point. As a guide I normally start it about half way across the square when you stitch. Ensure both ends of the strip extend pass the square.

Trim down to a ¼” seam then press the strip away from the background.

2 – Lay the second strip on top of the first, ensuring both ends of the strip are extending pass the square and sew along it. Press open away from the background.

4444

3 – You are now ready to work on the second side. Take the outer point strip and like the first point lay it at an angle across the top left side of the square.  The strips can overlap with the right pair at the bottom or there could be a gap- each variation affects the wonky point, just ensure the strip extends pass the square at both sides.

Sew the strip, then trim the excess fabric down to a ¼” seam. Press the strip away from the background.

Tip: If you would like your star points to be more pointy (i.e. can’t see the join of both sides, ensure that when you place the second section, the part where they overlap on the sewn line is ¼” or less from the edge of the block.

4 – Take the inner star point strip and lay it across the opened strip, ensuring it extends pass the square. Sew and press the strip away from the background.

5555

5 – You are now ready to square up your star point! Trim the piece down to 2.5” square.

6- Repeat this 3 more times to have 4 star point squares.

7- Lay out your star points, the centre fabric and background corners in your desired layout of 3 x 3.

Sew each row separately and press seams to the side. For the top and bottom row press the seams away from the centre square (star point). Then the middle row press seams towards the centre. This will help the seams sit together (nest) for a flatter block.

6666

Sew the rows together and as the seams on each row have been pressed to alternative sides, it is easier to line the rows up as the seams sit neatly next to each other.

Hopefully you are all still with me! And your block is now done!

Don’t forget to use the hashtag #scrapbagsampler on IG to show us your version or one of the variations.

Scrap Bag Sampler Week 2 – Strippy Curves


STRIPPY CURVES

Today @getahashtagkim has come up with a fun and different block for you to try out and experiment a little bit out of your comfort zone!

Don’t be alarmed- curves and improv aren’t as tricky as you may think! In the following Kim will take us through gentle improv and a no pin style of sewing. Stay with me…


Cut four 9½ x 2½ inch strips. Lay four 9½ x 2½ inch strips in your chosen order.


Then take two strips and overlap them by about an inch as shown with pin markers.


Using a small rotary cutter, cut through both layers where they overlap, making small curves. Go slowly to avoid shifting the two strips, pin them together at the far end if it helps. Discard the narrow scraps. Admire your hills and valleys.


Cut and sew each pair of strips one at a time to ensure the curves match. Those straight sides in the middle will be cut and sewn later.

Take one pair & sew along the curvy edge RIGHT SIDES TOGETHER using a narrow seam allowance, 1/8th inch is easier than trying for a normal ¼ inch.

You don’t need pins, trust me! Just go slowly, carefully lifting & turning the top layer as you go to align the edge with that of the bottom layer. Don’t pull or you’ll stretch the fabric. You may only manage a couple of stitches at a time before you have to leave the needle down and raise the foot to work around the curves and wriggle the fabrics but it will work.


It may look like a mess right now but go with it, it will press flat, just take it slowly. Lay one strip flat on the ironing board, hold the other one up and gently nudge the tip over the iron along the seam allowance to press it over to one side.


Overlap then cut the remaining straight sides as shown earlier. Sew and press as before. Give the block a final press, then trim to a 4½ x 8½ inch block. Look forward to seeing your curves!


Visit our designers on Instagram to see our versions of this block : @cotefleurie @getahashtagkim @JustSewSue @lisasew @metroquilter @picosailors @pippaspatch @quirkyhannah  @surfseasew @therunninghare

#scrapbagsampler

Scrap Bag Sampler – Week 1 Fun with Flying Geese


Foundation Pieced Flying Geese

Dip your toes into foundation paper piecing with this strip of flying geese designed by @justsewsue to start off this sewalong!

The pattern and instructions below belongs to Sue so please stop by her IG account or her blog too!

Materials:

You will need…

  • 5” to 3” squares of background fabric cut into triangles
  • Assorted scraps for geese measuring at least 2.5” by 4.5” but don’t cut your pieces down to this size as you will trim as you go
  • Foundation paper (or if you prefer regular printer paper). Sue uses Jenny Doak’s foundation paper that you can find on Amazon.

Method:

Download the foundation pattern here.

Print onto your desired paper at actual size (if you use greyscale it uses less ink). Measure the test 1″ box to ensure it’s printed correctly and then away you go!

If you are a planner mark on the paper the colour fabric that for each goose. Don’t use a Frixion pen as you will lose the markings when you press your work. Otherwise just go for it and be random!


Then cut apart the paper patterns leaving a good quarter inch around the dark cutting line.


You are ready to start sewing. The first section is potentially the trickiest but after that you just follow the numbers.

Take your first geese fabric and place it on the wrong side of the foundation pattern, face up. Pin on the right side parallel to the stitching line between A1 and A2. Fold back the foundation along the stitching line between A1 and A2. Trim the fabric ¼” away from the line of the paper.

Place a background triangle of fabric face down on your geese fabric, matching the edge

of the background triangle to the geese triangle.  Keeping a firm hold of the fabric, turn over

and pin perpendicular to the line between A1 and A2. 

Turn your stitch length down to 1.6 as the paper will be perforated and much easier to remove. Stitch along the line between A1 and A2. Starting in the seam allowance and continuing into piece A4. Press the fabric away from A1 and double check the darker fabric isn’t showing in the background. If it is, this is the time to grade the seam by trimming the seam allowance of the darker fabric.

Now it’s time to repeat your actions for piece A3. Remember the mantra – trim, stitch, press, repeat.

Fold the paper back on the line between A1 and A3. You may tear some of the paper, but don’t worry that will make the removal of the paper easier. If you rip too hard, use a scrap

of foundation paper and a glue stick to repair the tear, don’t use sticky tape, it won’t end well!! Trim the fabric ¼” away from the line of the paper. Place a background triangle of fabric face down on your geese fabric, matching the edge of the background triangle to the geese triangle.  Keeping a firm hold of the fabric, turn over and pin perpendicular to the line between A1 and A2.

Stitch along the line between A1 and A3. Starting in the seam allowance and continuing into piece A4. Press the fabric away from A1 and double check the darker fabric isn’t showing in the background.

Instead of pressing you can use a wallpaper seam roller but definitely press with an irononce the unit is completed. Repeat the sequence – trim, stitch, press, repeat until you have sewn all twelve sections. This is a good leader and ender project.

Press the finished block and trim to 4½ x 2½ inches. Sometimes the paper shrinks slightly

when pressing, so just make sure you cut to the correct size.Wait to sew sections together until you have a better idea of what size you need, but this block would look great as a rainbow.


Visit our designers on Instagram to see our versions of this block : @cotefleurie @getahashtagkim @JustSewSue @lisasew @metroquilter @picosailors @pippaspatch @quirkyhannah  @surfseasew @therunninghare

#scrapbagsampler

Scrap Bag Sampler – Schedule!

Who’s excited about Friday’s kick off on the #scrapbagsampler sewalong ???

Block instructions will be published every Friday on our blogs and we will all be posting our own versions of the block on Instagram too. Keep checking that hashtag !! #scrapbagsampler 

Our first stop is with Sue also known as @justsewsue on IG 
Followed by :-

17 January @getahashtagkim

24 January @quirkyhannah (Me!!)

31 January @metroquilter

7 February @cotefleurie

14 February @pippaspatch who blogs Here
21 February @picosailors who blogs Here

28 February @therunninghare

6 March @Lisasew

13 March @surfseasew

Towards the end of March you’ll have all the blocks and can get on with finishing your project.

You could make the bucket bag which Sue has graciously designed and will share with us on 20th March.

Sue’s design needs a panel 30” by 8” (finished) and she has used :- six 4” squares, three 6” squares, one 2” square, one 2 x 4” strip and two 2” x 6” strips.

Do you already have some small blocks which are unloved? Incorporate them into your design.

You can mix and match, most of our blocks are variable in sizes.

You can customise your favourite bag pattern, tote bag, project bag, how about a cute zipped pouch, a mini quilt, you could even make more blocks for a baby quilt or super size them up for a lap quilt. Use those scraps, they will just keep multiplying otherwise.

The end of the sewalong will be 9pm GMT Easter Monday April 13th and please share your finished projects using the #scrapbagsampler hashtag. Myself and all the designers can’t wait to see what you make and share our own finishes with you.

Roll on Friday !!!

Scrap Bag Sampler – Intro Post

This post is a little overdue…. but just in case any of you (who are still around) and not on Instagram I will be one of the designers taking part in the Scrap Bag Sampler sewalong that has been organised by Just Sew Sue.

It’s a fun little sewalong that starts on 10th January with the ethos of not going out and buying new fabric or patterns to join in but rather dig through your scraps (or stash) to make small blocks every week to try get that pile under control!

Over the course of ten weeks a designer will share a project each week of a small block that is perfect to hone your skills or try out new techniques. The blocks are small enough to even been treated as leaders and enders for other projects you are working on.

During the last week a bucket bag pattern that Just Sew Sue has specially designed for this project will be released which you can use your patchwork panel for. This bag will be approx 8″ tall with a diameter of 9.5″ which means your finished panel will be 30″ x 8″.

That said if you have  a favourite bag  pattern please feel free to use that and also if you have random lone blocks lying around incorporate them into the project- anything goes.

So without further ado the designers for this project are (with links to their Instagram page): @cotefleurie @getahashtagkim @JustSewSue @lisasew @metroquilter   @picosailors @pippaspatch @quirkyhannah @therunninghare

Hope to see you all join in! If you post on Instagram please use the hashtag #scrapbagsampler so we can all find you 🙂